 Epson R-D1 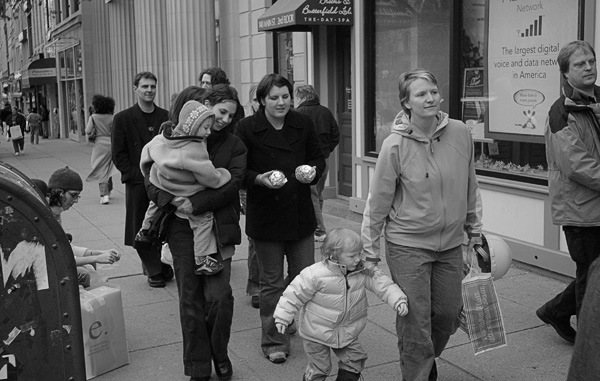 Northampton, Massachusetts, Overcast: Epson R-D1, Canon 28/2.8 ISO 800 1/194 sec. Seiko Epson and Cosina Voigtlander jointly developed the Epson R-D1 digital rangefinder camera. To both companies, I say: congratulations. This is an exceptional little camera, one of the best and most enjoyable I have ever used. Just an hour into working with the R-D1 on the streets of Northampton, Massachusetts I already felt like the camera was an old and familiar friend. A good deal of intelligent design has gone into this Epson. The shutter and shutter dial lie exactly where the index finger falls. The analog indicators in the chronograph-style display, on top of the camera, reveal their information at a glance. (Theres a good reason that most automakers have stuck with analog style speedometers and tachometers despite occasional forays into digital displays: they give the driver critical information quickly.) In the same vein, virtually all of the key control settings on the R-D1 (shutter speed, aperture, focus distance, EV compensation, white balance, capture mode, frame lines, ISO and exposures remaining) are readily and quickly conveyed to the photographer by intuitive, analog means. I worked for hours at a time with this camera without ever having to look at or use the settings on the fold-out-and-twist LCD. It was very much like using a rangefinder film camera and the experience was a true pleasure, reminding me of how much I had missed working with traditional cameras. With just one exception, discussed below, the camera stayed out of my way, allowing me to make pictures and make adjustments without interfering with the process and without slowing me down. The Epson R-D1 is the first digital rangefinder camera ever made and it accepts Leica M (bayonet mount) and LTM (screw mount) lenses, the latter via an adapter, with rangefinder coupling. Epsons decision to use this mount allows the photographer to choose from a staggering variety of lenses made throughout the 20th century and into the present, each with its own distinctive characteristics. The camera body is about the weight and size of a Leica M2 (a bit taller and thicker) and it feels well balanced in the hand. I carried it in my right hand all day without my hand or arm tiring. In an unusual design move, the cameras shutter is cocked by a manual lever that feels much like a short-throw film advance. When I first read about this feature I questioned its value. Now that Ive worked with the camera, I find that I really like it and like the rhythm it helps to create when Im working. Advancing the lever after each exposure makes that exposure seem more distinct and more deliberate. 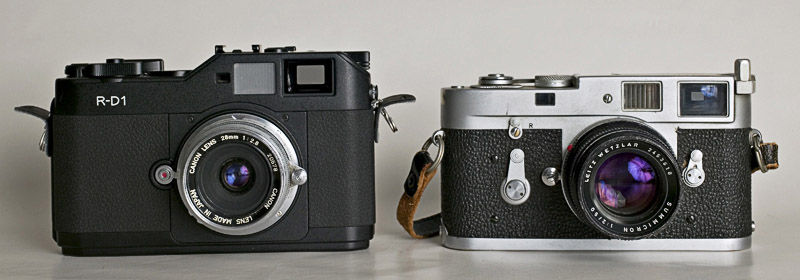 The Epson R-D1 next to one of my friend Ben Lifsons well-used Leica M2s Viewfinder The R-D1 has a large, bright, beautiful finder. Its nearly as good as the finder in an M Leica. There are photographers who prefer rangefinders and others who prefer SLRs. Needless to say, there are pros and cons to each system. Rangefinder cameras are usually smaller, lighter and quieter than SLRs. Since they dont use reflex mirrors, they tend to have less vibration than SLRs during exposures and this can be an asset when working hand-held at slow shutter speeds. Their lenses tend to be compact. The core advantage of a rangefinder, for me, however, lies in the way in which it allows one to see and frame the picture before its captured. A rangefinder shows one the world through a window with lines indicating the pictures borders. That allows one to look at what will and will not fall within those borders. In other words, one sees the world of the picture about to be made as well as the world just outside it. This can give one a greater sense of the ways in which the picture might change by either 1) changing the framing or 2) allowing elements outside the frame to move into the frame. Epsons 1:1 finder takes this strength one step further. Since the finder shows the world at life size, one can work with both eyes open. One eye sees the world as it appears in the frame; the other watches the world outside the frame that may soon enter it. Or perhaps we could say that the right eye sees the trees and the left eye sees the forest. Then theres the issue of viewing depth of field. An SLR normally uses an automatic aperture that remains open during composition and only closes to its set aperture at the moment of exposure. So, lets say the camera has a 50mm F/1.8 lens mounted and set to an aperture of F/8. The exposure will be made at F/8 of course but the viewing used to compose and choose the moment of the picture will be seen through the lens wide open. That means that one will only see a certain range of distance in the frame (usually the foreground subject) clearly, everything behind and ahead of that focus zone will be blurred. So while the film or sensor will see at F/8 when the exposure is made, the photographer sees at F/1.8. Its hard for one to make a picture he or she cant fully see. One can get around this using a depth of field preview button but that method tends to work better when the camera is on a tripod. When working handheld, using a DOF preview button can be cumbersome and makes for a dark finder where things are harder to see. The rangefinder has the opposite problem of showing all distances from the lens in focus. One process is additive and one is subtractive. With the SLR, one must see certain distances out of focus and imagine what they will look like in focus. With a rangefinder, one sees all distances in focus and must imagine what some of them will look like out of focus. I prefer the latter way of working.  Epson R-D1, Lens Unknown, ISO 400, 1/45 Second Photograph By Ben Lifson Those of us who prefer rangefinders have, until now, had no digital options. Its a pleasure that the first one made has such an excellent finder. The R-D1 has a switch located on top of its body that changes the framing lines inside the finder to match the effective field of view (FOV) of the camera when 28, 35 and 50 mm lenses are mounted. The sensor in the R-D1 is smaller than a 35mm negative so the effective FOV of a given lens is 1.5 X its focal length. So the 28, 35 and 50mm lenses have the effective FOV of 42, 53 and 75mm lenses (respectively) used on a 35mm camera. Epson includes a handy FOV conversion scale on the back of the camera (seen when its LCD is reversed) that lists lenses from 12 90mm and what their effective FOV is on the R-D1 (see photo below). As a nice stylistic touch, this scale is reminiscent of the ASA/DIN conversion scales that appear on cameras like the Leica M2. The framing lines are parallax corrected so that they shift according to the distance a lens is focused at. Special accessory D series finders are available from Voigtlander that match the FOV of 12, 15, 21 and 25mm lenses when mounted on the R-D1. I will be testing most of those lenses and their finders for an upcoming follow-up to this review. 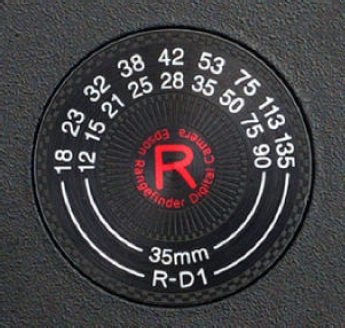 Eyeglass wearers have reported that they have difficulty seeing the 28mm lens framing lines in the R-D1 finder. I dont wear glasses and have had no such problems. The framing lines on the camera are parallax-corrected so that they move to the right and down as the lens is focused at shorter and shorter distances. Leica M cameras set their framing lines automatically as various lenses are mounted but I didnt mind at all having to set these manually on the Epson. The framing lines arent especially accurate; Epson lists them as showing approximately 85% of the actual capture area at a focus distance of three meters. This is not unique to Epson or Voigtlander, however. To quote Voigtlander expert Stephen Gandy: As lenses are focused from near to far, the angle of view actually increases. While this change is slight with a 21 mm lens, it increases substantially for a 135 lens. A few rangefinder cameras correct the problem with variable frame line size as you focus, including most Polaroid film pack cameras and the Konica IIIM. The Leica Ms solutions are frame lines showing the slide mount area at the lenss closest focus distance. This is another way of saying you get more on the film at infinity than is showing in your viewfinder making sure your film gets at least what you see in the frame lines. In practice, I compensated for this inaccuracy by imagining the picture (as I saw it through the finder) as ending just outside the frame lines as opposed to just inside them. The Rangefinder Itself A rangefinder is a mechanism for setting manual focus by superimposing two images in an area of the viewfinder called a focusing patch. It works well at all light levels and is often more accurate than SLR focusing, particularly when photographing at low light levels or with wide-angle lenses. There have been many reports on the web of R-D1 owners with rangefinders that do not seem to be giving accurate focus with all lenses at all distances. The problem seems to be most reported when the camera is used with very fast lenses longer than 50mm. The R-D1 also has a fairly short rangefinder base length of 37mm. Stephen Gandy: The R-D1 should be able to focus a 50/1.4 consistently, but never lenses like the 50/1 or 75/1.4 consistently wide open and close up. A 37mm base length is not long enough for consistently accurate focusing as you use longer and/or super fast lenses (such as the 50/1, 75/1.4, and 135/4), which exceed the capability of the R-D1s rangefinder accuracy wide open and close up. Yet, as you stop the same 50/1, 75/1.4 or 135/4 lens down several stops or increase the focused distance, you are back within the RD-1s focusing range.  Epson R-D1, Lens Unknown, ISO 1600, 1/90 Second For those who are experiencing rangefinder accuracy problems with the R-D1 its unclear as to whether they are encountering the inherent limits of the cameras rangefinder design, have a misadjusted example of the camera or are dealing with a problem that no one has yet diagnosed or understood. I am not an expert on this subject and can only note that the R-D1 I tested was able to focus accurately using the lenses I tested it with. It is interesting to note that the R-D1s rangefinder patch does not move with the frame lines as one changes focus distance. Since one is naturally inclined to center his or her eye within the frame lines, that positioning can place ones eye off-center with respect to the focusing patch. Some have suggested that this may make it easier for photographers to misfocus the camera. Lenses When the 3.3 megapixel Canon D30 DSLR was first released, there were many people (some camera reviewers included) who argued that higher quality lenses (such as the Canon L series) would be wasted on the camera. Their arguments were based on mathematics, citing resolution numbers, etc. Yet, the first time I put a 20-35L lens on my D30 and looked at the results on the screen, I immediately saw the difference the lens made. The fact is that mathematical arguments against using high-end lenses on digital cameras dont withstand the test of the eyes. Every lens has its own way of drawing, if you will, an image on the sensor or frame of film. The core characteristics of that drawing hold true regardless of the capture method. While it may be true that lens X can resolve Y number of lines per mm while the sensor of a camera Z can resolve only a lesser number, that fact does not negate the influence a given lens has on the final look of an image. Theres more to a lens that just resolution. I also think its important to consider that there are many different ways an image from a good lens can look. Historically, some manufacturers have aimed for a very crisp look with very distinct tonal separation achieved largely by micro contrast. Others have aimed for a somewhat more even, creamier tonality with less crispness. Defining the subtle characteristics of a specific lens can become somewhat like trying to describe the flavor of a wine. The differences can be subtle but they most definitely exist regardless of the capture medium.  Epson R-D1, Lens Unknown, ISO 1600, 1/160 Second There is an excitingly broad range of lenses out in the world that are ready to be tried on the R-D1. For most of the 20th century, there were many manufacturers competing to produce fine lenses in the Leica LTM and M mounts. First and foremost, of course, is Leica itself, which has produced many outstanding lenses. But there are also many other companies who have produced exceptional lenses that fit these mounts. So far, my favorite lens on the R-D1 is a Canon 28/2.8 in LTM mount. This now rare lens was used by Garry Winogrand for much of his most recognized work. By the numbers, it wouldnt outperform a modern Leica lens, but it offers an interpretation of the world that I very much like. The hunt for these old lenses can be a pleasure unto itself. Its a great thing to wander into a used record store and find an old album by, say, Louis Armstrong and Earl Hines. It might even be a bargain. Its a similar pleasure to wander into a camera store in some little town and discover a beautiful old Leica lens that someones great uncle left behind when he passed from this world into the next. There are interesting, sometimes obscure lenses scattered around shops and estate sales all over the world. The Epson R-D1 can use many of them. In experimenting with these older lenses, photographers born well after they were manufactured may discover an attraction to the way, say, Leica thought a lens should draw its image in 1955. My hunt has begun for an M mount Canon 28/2.8 Needless to say, photographers who already own a large number of M and LTM rangefinder lenses now have the option of using them on a digital body. Photographers who do not own these can buy some superb, albeit very expensive, Leica lenses brand new. Cosina Voigtlander also makes a very well regarded line of lenses in these mounts that are quite reasonably priced. In fact, many of them are real bargains.  Epson R-D1, Lens Unknown , ISO 400, 1/500 Second Initially I tested the R-D1 with the Canon 28/2.8 mentioned above as well as a 50/2.0 Leitz Summicron and a 90/2.8 Leitz Tele-Elmarit. I have been testing with other lenses as well and updating this review over time. I havent used the 90mm much yet because I dont have an accessory finder for it that matches the FOV for the R-D1. The 50mm gives a 75mm effective FOV which is about as long an effective focal length as Id want to use on a rangefinder body. For longer lenses, which I very rarely use, I prefer SLRs. As discussed above, I have not had any problems with focus accuracy using any of the three lenses above. The classic rangefinder focal lengths are 28, 35, 50 and 90mm. Using 28, 35 and 50mm lenses with the R-D1s built in frame lines covers the equivalent FOV of 42mm, 53mm and 75mm lenses. For a somewhat wider FOV one could use a 24/25mm lens (38mm FOV) or a 21mm lens (32 mm FOV). As mentioned above, Voigtlander makes special accessory finders designed specifically to be used with these lenses mounted on the R-D1. Leica is sending me a 28/2 Summicron and 35/2 Summicron to test and CameraQuest is sending various Voigtlander super- wide-angle lenses and their R-D1-specific finders for testing. The results of that testing will appear in a follow-up to this review. Some R-D1 photographers have expressed concern about vignetting with certain wide-angle lenses; that issue is discussed further below.  Northampton, Massachusetts, Overcast: Epson R-D1, 50/2.0 Leitz Summicron ISO 800 1/338 sec. Build Quality/Controls Overall, the R-D1 is well constructed. The body itself is made of magnesium alloy and most of the plastic pieces on the body seem quite solid. The frame selector lever feels a little flimsy but thats mostly nitpicking. The on/off switch is located just ahead of the shutter cocking lever pivot where it is very unlikely to be moved accidentally. The shutter dial is positioned so that its edge sits right at the front of the camera, in perfect reach of my index finger. ISO is set just as it is with many traditional film cameras, by lifting the shutter dial ring and rotating it to change the ISO number displayed in the window. This is quick, easy and keeps the ISO setting in plain view. In place of a film rewind knob, the Epson has what they call a JOG dial. Used in conjunction with a spring-weighted white balance/file quality lever, this JOG dial allows very quick and intuitive adjustments of many kinds. Capture quality can be set to RAW, JPEG large (marked as H) and JPEG medium (marked as N). The latter two are actually misnomers, as high (H) and normal (N) usually refer to JPEG quality. The R-D1 actually uses only one JPEG compression level (1:4) and allows one to vary the size of the file from 3008 x 2000 pixels (large) to 2240 x 1488 (medium). The actual quality of the JPEG doesnt change. Its a minor point, but for clarity Epson should mark the settings as L and M so that photographers have a better indication of what is actually being changed. 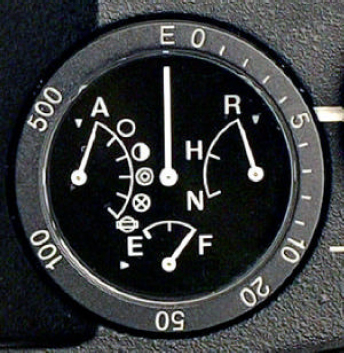 Changing quality and WB settings is simplicity itself. Rotate the spring-loaded lever on the camera back (just below the shutter cocking lever) to Q and turn the jog dial to cycle through the R, H and N settings shown in the analog display. Rotate the lever to WB and turn the jog dial to cycle through the various white balance settings shown in the analog display. The selection lever sits right where my right thumb normally rests and the JOG dial falls within easy reach of my left thumb. Its the quickest and easiest system Ive ever used to change these settings and adds to the fluidity with which this camera can be used. To the left of this lever is an exposure lock button that holds a metered shutter speed as long as it depressed. The outside scale of the analog display shows the estimated number of exposures remaining on the SD card. The indicators are general at first: 500, 100, 50, 20 and then count down frame by frame from 10 to 0. Its a great design; everything you need to know, nothing you dont. Battery strength is indicated by a fuel gauge type empty to full scale in the analog display; once again, its a simple and clear system. Battery life from the included Epson Li-Ion battery is nothing special. Working outside in 45-degree weather I got about 200 RAW exposures to a charge. The battery would last longer in warmer weather, but plan to buy an extra battery or two if you get an R-D1. Given the battery life Ive seen and the colder weather I sometimes shoot in, Id prefer to start each full day of shooting with three charged batteries (that allows for an extra battery just in case). I primarily used the R-D1 LCD screen only to format cards and check histograms (more about that below). To access the screen, one folds out the rear panel to a 90 degree position, rotates it 180 degrees counter-clockwise and then folds it back in. Since the APS-C sized sensor in the R-D1 does not provide a live video feed, the LCD cannot be used as a monitor while shooting. There are five buttons arranged in a column next to the 2 LCD screen. Pressing the top button turns on the monitor and displays the last recorded picture, turning the jog dial clockwise cycles the pictures through in reverse order while turning it counter clockwise cycles the pictures through in forward order. Lifting up on the JOG dial and turning it changes the information being displayed to an overlay grid, an overlay of settings used for the exposure (shutter speed, ISO, WB, etc.) or an overlay histogram. The bottom button can be user configured but is set by default as a delete button. Other settings are achieved through a combination of pressing the menu, enter and cancel buttons in conjunction with rotating the JOG dial. After a quick read of the manual, I found the whole menu system to be logical and easy to use. In fact, the R-D1 uses fewer sub-menus than many other digital cameras Ive worked with and this simplifies the setting process. Best of all, the whole LCD screen and associated menus arent used at all to make most of the major settings on the camera (shutter speed, WB, quality, etc.) and I normally have the LCD off and folded in while I'm working. 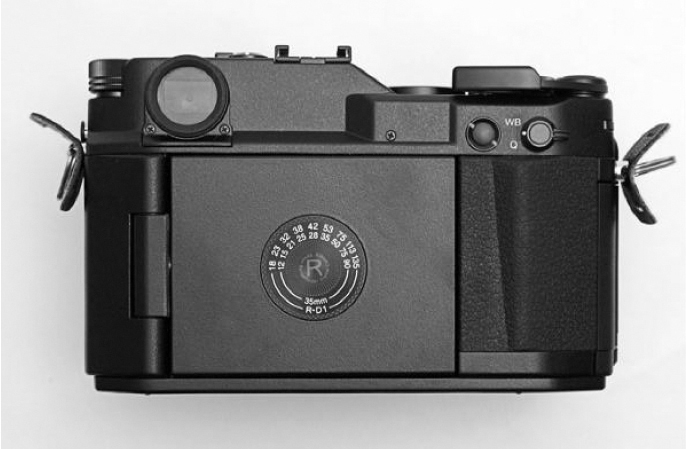 The R-D1 includes a traditional X-synch flash socket. Otherwise, there are no ports or jacks of any kind. Files are transferred from the SD cards via a card reader; there is no USB or Firewire port on the camera. I very much like the simplicity of that design but it does preclude using the R-D1 tethered to a computer (not an issue for me) and requires that firmware updates (if indeed the firmware is upgradeable) be installed using SD cards. Remote release of the shutter is accomplished the traditional way, via a mechanical cable release screwed into the shutter release button. No cable release is included with the camera but they are, of course, widely available and are very inexpensive. 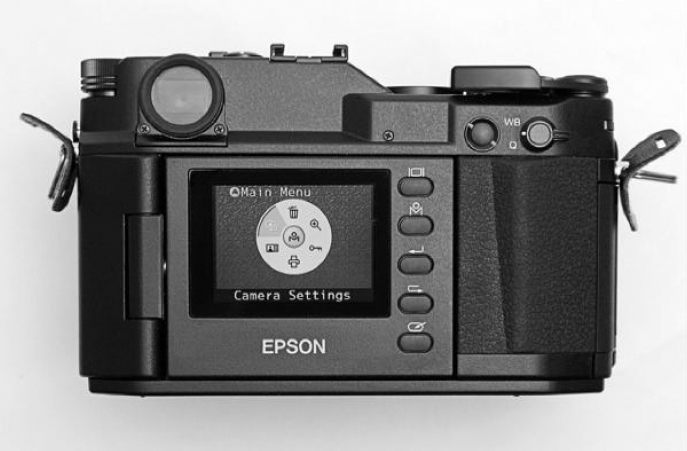 Metering and Exposure There are three ways to make exposure settings on the R-D1. 1. Set the aperture and shutter speeds directly based either upon experience or information from a hand-held light meter. If you dont choose to half-press the shutter while looking through the viewfinder, you can successfully ignore the fact that the camera has a built in meter at all and instead pretend you have a Leica M2 in your hands. This versatility is another piece of intelligent design. 2. Use the recommendations of the cameras built in light meter. Set the aperture and half-press the shutter release. Your chosen shutter speed will appear in red and the cameras suggested shutter speed will flash in red. Once you choose the shutter speed recommended by the camera, it will simply appear in red. Best of all, you can ignore all this flashing and whatnot by simply not half-pressing the shutter in advance of the exposure. 3. Use the cameras aperture priority mode. Set the shutter speed dial to AE and it will meter through the selected lens aperture to select an appropriate shutter speed. And its pretty good at it, erring slightly on the side of underexposure to protect the highlights. This is just the way I set exposure with digital when working manually. When you half press the shutter release the camera will display its chosen shutter speed in red in the finder. The shutter dial locks in AE position until and unless it is unlocked with a release button located just behind the shutter dial. I used this mode almost continually because the camera was doing a good job metering and because it allows the shutter to select precise intermediate speeds like 1/320 second. You can make EV correction settings by moving the shutter dial in either direction from AE 1/3 stop at a time with a range of two stops in either direction. Click to enlarge the photograph below to see how these settings are laid out on the shutter dial. 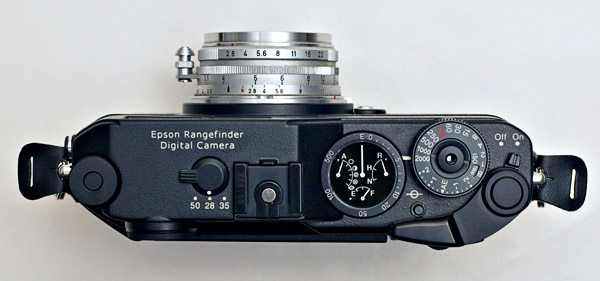 Using any of these modes you can check your final exposure results via the histogram display. See this article for background information on histograms if desired. The camera does not have an image review with histogram feature but can be set to almost do that. Until it is turned off, the camera remembers which overlay it was set to on the LCD. Open the LCD and turn it on. Use the JOG dial in the upper position to set the review overlay to histogram mode. Slide the JOG dial back down. From now on, whenever you turn on the monitor it will display the last recorded file with the histogram overlay. That way, you can get a one-touch histogram at will after any exposure. Its not an automatic review but its very close. The camera will not display a review image (with or without a histogram) until it has written the file to the SD card. It will stay in this mode until one either changes it to another display mode, physically turns off the camera power switch or the camera puts itself into sleep mode. Note to Epson: If the R-D1 can be upgraded via software loaded to an SD card, consider revising the camera firmware so that the camera can remember its selected display mode even after being powered down by sleep mode or the on/off switch. If it cant be upgraded, at least change the firmware on current production cameras to allow this. Histogram review is a key part of many digital photographers workflows and a serious camera should provide a histogram as readily and easily as possible. This is one area Epson needs to improve. In the meantime, if your shooting workflow includes checking your histogram regularly, I recommend leaving the camera on throughout the shoot and setting the sleep mode to its maximum of 20 minutes (since sleep mode cant be shut off all together). Olympus didnt get the histogram workflow right with the E-1 either so both Olympus and Epson should study Canons DSLRs long enough to learn how a histogram feature should work.  | |Epson R-D1 With Leica 21/2.8 Elmarit Aspherical, ISO 400, 1/80 Second On the other hand, Canons histogram features better be good because none of their digital bodies Ive owned (D30, 10D, 1Ds) have been able to effectively meter a subject in bright sunlight. The 1Ds is better than the 10D but both require careful study of the histogram and then, usually, about a 2/3 to one stop negative EV correction to hold highlight detail. And even then, if you go from open sunlight into an area all in shadow, you need to bring the EV back up again. In short, the Canon digital bodies require one to keep a close eye on the histogram after exposures lest things go too far off the scale one way or another. Or, you can set exposure manually with them which sometimes works better. The R-D1, on the other hand, meters very well and is rarely off by more than 1/3 of a stop. In other words, its meter is a good deal better than my own internal meter whereas the Canons sometimes leave me muttering to the camera never mind, Ill figure out the exposure myself. With the Canon DSLRs its me and the histogram working as a team, the meter is sometimes a bystander. I have no idea why this should be the case. My Nikon Coolpix 990 metered beautifully even in tough lighting and the Leica Digilux 2 I tested also metered very well even in high contrast light. So the Epson histogram firmware needs some improvement but the camera meters so well that checking the histogram is a bit less of a necessity than it is with some other cameras. I worked with the camera for two days (admittedly in mostly overcast light) and rarely checked the histograms. The exposures were almost all on the money or off by a 1⁄2 stop at the most. In bright sunlight, the camera can occasionally overexpose by as much as a stop but only in very contrasty lighting. Shooting in RAW, as I generally do, gives me about 2/3 to 1 stop latitude in either exposure direction. Working Quickly & File Buffers Using JPEG high mode and a fast SD card such as the Sandisk Ultra II 512MB or the Simpletech PRO-X 512MB, the R-D1 can shoot continuously (allowing, of course, for the need to cock the shutter after each exposure). I got up to 40 rapid successive exposures and then stopped counting. The buffer is sufficiently large and the data transfer sufficiently fast that the camera simply does not bog down in JPEG mode with a fast SD card. This is true at all ISO settings. With a slower SD card such as the standard Lexar 256 MB it is possible to run into a slight delay from the JPEG buffer after about 25 consecutive exposures but I imagine that it would be rare that anyone would need that kind of consecutive shooting ability with this type of camera. So for use in JPEG mode, even the standard SD cards seem to be fast enough. Unlike the Leica Digilux 2, the Epson does not seem to be applying any kind of filtration to its JPEG files that degrades their quality. As such, the JPEG mode of the R-D1 is quite useable at all ISO levels, a trait that it shares with many DSLRs. If one needs to work very quickly and make many exposures, the camera can do this easily in JPEG mode. 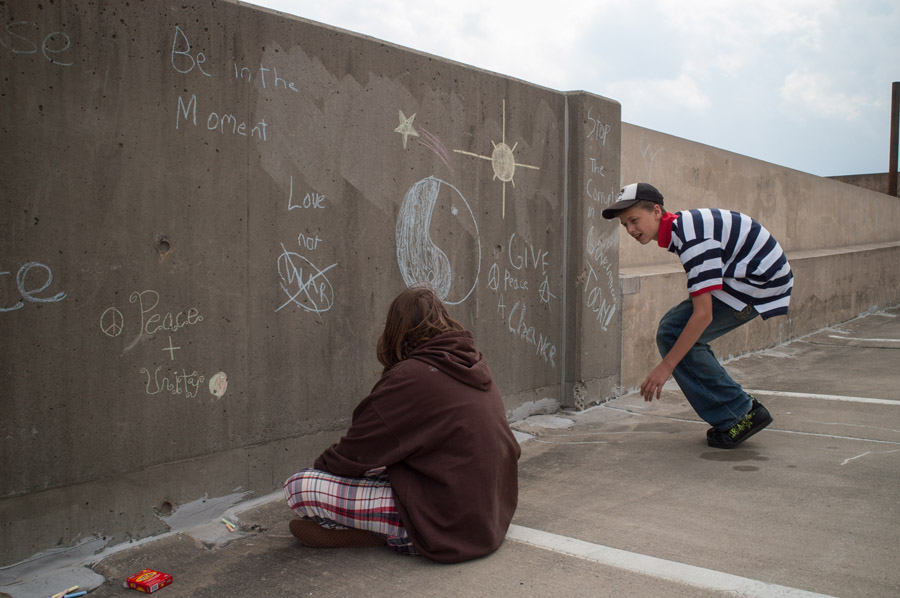 Epson R-D1 With Leica 21/2.8 Elmarit Aspherical, ISO 200, 1/340 Second Many photographers, however, myself included, prefer to shoot in RAW mode. RAW files have the highest quality that any given digital camera can produce and have the greatest dynamic range. Moreover, they usually allow at least a stop of exposure correction (during RAW file conversion) for either under or over-exposure, allowing one to recover highlight or shadow detail (or both) when needed. This is particularly valuable considering that digital cameras have very little tolerance for overexposure. If highlight detail blows out in a JPEG capture, its basically gone. In the same way that film gives us both exposure and development as two distinct, and controllable, phases of creating an image, RAW mode gives us both exposure and RAW conversion (which is somewhat analogous to development). Its been my experience that photographers who once did (or still do) their own film processing much prefer the control and flexibility available with RAW files. I certainly do. RAW also allows me to ignore white balance settings while Im shooting. Instead, I set the white balance using eyedropper sampling during RAW conversion (development). A further thought it strikes me just now that digital RAW processing has a key advantage over traditional roll film development. And that advantage is that the interpretation of the development can be applied frame by frame, so to speak. In the film world, one can do that with sheet film (applying, for example, an N+1 development to increase the silver density in the highlights and thereby increase contrast). But with roll film, one has to apply the development decisions uniformly to every exposure on a given roll. So, I find that there are many good reasons to shoot in RAW mode and I do so about 95% of the time for both my professional and personal work.  Epson R-D1, Lens Unknown , ISO 400, 1/1000 Second The R-D1 does have a RAW buffer but it only allows 2-3 successive exposures (more often 2 than 3) before the camera has to wait for the buffer to free up space by writing to the SD card. To its credit, the camera seems to allow the next exposure as soon as there is room for one more file in the buffer. In other words, the buffer does not need to empty completely before a new exposure can be made. So the shooting rhythm with a fast SD card is basically 2-3 exposures in succession and then a delay of 2-3 seconds between exposures before additional exposures can be made. If at any point, there is a pause at least 8 seconds long between exposures, the buffer empties completely and the cycle begins again (2-3 exposures in succession are possible followed by the 2-3 second lags between exposures). There was no significant difference in lag times between the Sandisk Ultra II and Simpletech Pro-X 512 MB cards tested but both were much faster than the standard SD card. Using a slower SD card such as the standard Lexar 256 MB, the camera can make 2-3 successive exposures followed by 4-5 second lags between exposures. This is a significantly increased delay and therefore photographers who plan to use RAW mode regularly should strongly consider buying only the fastest SD cards. Overall, the RAW buffer performance is much better than weve seen with the Leica Digilux 2 and most other small-sensor digital cameras. On the other hand, its not nearly up to the performance one can find in various sub-$1500.00 DSLRs. For $3000.00, the R-D1 should have an ample RAW buffer; at least five times its current size. I believe that the RAW buffers on cameras designed for serious photographers should be sufficiently large that one can shoot at least 10 RAW exposures in succession without ever encountering a delay. The technology needed to do this is certainly available, as Canon, Nikon, etc. have shown us. Essentially, a serious digital camera should be able to respond to the photographer at will (as film cameras do). The photographer should never be waiting for the camera, especially one that costs $3000.00 Shutter Noise Conventional wisdom has it that rangefinder cameras are quieter than SLRs and often that is the case. The mirror mechanisms of an SLR can add a lot of noise. The Leica M rangefinders have a reputation for being particularly quiet. That said, there are some very quiet SLRs and some loud rangefinders. For example the Voigtlander Bessa (not the R2 but the original) rangefinder has a quite loud, metallic sounding shutter. The Canon 10D digital SLR has a fairly quiet shutter and the Olympus E-1 is quieter still. Ive tried the Bessa and the 10D side by side and the 10D is much quieter than the Bessa.  Epson R-D1, Lens Unknown , ISO 400, 1/1000 Second In order to get a somewhat unbiased opinion about shutter noise I asked an assistant to sit about seven feet away from the following cameras: Epson R-D1, Leica M2 and Canon 10D, while I tripped their shutters. She closed her eyes and I asked her to note which camera (we identified them only by number) was loudest and/or most noticeable. After multiple trials she ranked them and the results were a little surprising. Least noticeable was the Canon 10D followed by the M2 and then the R-D1. She said the key thing that got her attention was pitch, the 10D and Leica were both quieter than the Epson but the Canon had the lowest pitch. Her observation was that the higher the pitch, the more noticeable the shutter noise. She also noted that the lower pitched shutter blended in better with the sounds of normal conversation. The Epson was both a little louder than the Leica and higher pitched. No matter what order I tripped the shutters in (again, her eyes were closed) she gave the same ranking. All three cameras, however, were rated as much quieter than my Canon 1Ds. The moral of the story: If you really need a quiet camera (and cant use a sound blimp) consider an Olympus E-1 (which, in a previous test, my assistant had judged to be even quieter than the 10D) or the Leica M7. Or, better yet, consider the nearly silent Leica Digilux 2. All of that said, the shutter sound of the R-D1 did not draw any particular attention to the camera when I was working with it on the streets of Northampton. There are some potential situations for which this camera may not be quiet enough but for the vast majority of photographic work, its shutter sound is not a problem at all. Included Software: RAW Processing & Workflow Included with the Epson R-D1 are two CDs. One can only be used in a DVD-ROM drive and includes tutorials on using the camera. The second includes a PDF version of the camera user manual and two RAW file conversion programs. The first, PhotoRAW, is a standalone program that works only on Windows platforms. The second is the EpsonRAW plug-in for Photoshop 7/CS and it works on both Windows and Mac platforms. The plug-in is essentially a smaller version of the PhotoRAW program without the latters batch conversion capabilities. Otherwise, though, it has exactly the same controls and so most of the comments Ill make below about PhotoRAW apply equally to the EpsonRAW plug-in.  Epson R-D1, Lens Unknown, ISO 800, 1/750 Second The R-D1 does not have a RAW+JPEG recording option and I am not aware of any third-party image management programs that can browse its ERF format RAW files (as of the date of this writing). This means that most photographers who work with the R-D1 in RAW mode will likely initially want to batch process the RAW files to get a set of working files for editing, etc. My own process is to batch the RAW files in PhotoRAW to JPEGs initially. From there I edit and sort in ThumbsPlus Pro or BreezeBrowser using the JPEGs. If I choose to use a file for a final print (or a final digital file) I go back and re-convert it from RAW into a 16-bit TIFF. This method works well, especially considering that only a small percentage of my work on any given day will be chosen for final files. Those readers whove worked in darkrooms will be familiar with the term work print; I use the batch converted JPEGs as digital work prints. On my editing computer (Windows 2000, Athlon 3.2 GHz processor, 1 GB memory) it takes about 7 seconds to convert one individual ERF file to a 16-bit TIFF (black & white or color). The RAW files are just under 10MB each so a 1 GB SD card will hold about 100 ERF files. Batch processing 100 ERF files to JPEG in PhotoRAW took about 18 minutes, 30 seconds on my computer working in the background while I used the word processing, e-mail and browser software. Working with the ERFs, I essentially used the same workflow I used with the Canon D30 CRW files a few years back. 1. As I fill high-speed SD cards with RAW files, I download them to a portable hard drive that I carry on my belt. While one card is downloading, I use another card in the camera. 2. Back at my studio, I copy the ERF files to a larger hard drive and then use PhotoRAW to batch process all of them to JPEGs for editing and work prints. I let this task run in the background while doing other things. I then burn the original ERF files to Kodak gold CDs for archiving (each set goes to one master CD and one backup CD). 3. Using the JPEGs Ive created, I edit and sort the files using Thumbsplus Pro and Breezebrowser. 4. If I choose a file to make into a final print or final file, I begin by making a 16-bit TIFF conversion from the original ERF file on CD (using either the RAW module in Photoshop CS or PhotoRAW) and then work further with the file in Photoshop CS.  Epson R-D1 With Leica 21/2.8 Elmarit Aspherical, ISO 400, 1/50 Second Since PhotoRAW is not currently available on the Mac platform, Mac users do not get a ready-made program for batch converting ERF files to JPEG or TIFF for editing and sorting. Fortunately, the RAW conversion module of Photoshop CS was updated to work with R-D1 RAW files even before the R-D1 itself was released in the US. It works beautifully with those files and gives an excellent conversion. Using Photoshop CS, Mac users should be able to design a Photoshop Action that would batch-process a folder of ERF files using the CS RAW conversion module. The PhotoRAW program itself is not as sophisticated, in some respects, as programs like Capture One DSLR Pro or the RAW conversion module in Photoshop CS. That said, it works very well and gives one most of the core controls needed for normal RAW conversions as well as some excellent special features that can be very useful for R-D1 photographers. 1. Gray point (white balance) color correction can be done by eyedropper sampling (my preferred method) or by the selection of any one of fifteen preset parameters that are unusually varied and specific (such as HCR Fluorescent: Neutral White). Color balance can then be tweaked using color temperature and tint sliders. Custom gray balance settings can be saved for re-use. 2. General exposure adjustment can be made using a simple EV slider and the histogram displayed can show overall exposure or exposure by color channels. Highlight and shadow points can also be specified if desired. 3. The preview file can be easily zoomed, scrolled and rotated. 4. Batch file conversion is intuitive and requires just a few mouse clicks (or graphics pen taps in my case). One can select an entire folder contents for batching or specify which files within that folder should be converted. 5. A Shooting Info tab displays the files EXIF information. 6. Film Types can be specified from a drop down list including: As-Shot, Color, Black & White, Sepia, Monotone and Vivid. One can then tweak the file further using sliders for Saturation, Tint, Edge Enhance, Contrast and Noise Reduction. Any combination of those settings can be saved as a custom parameter set and re-used on other files. 7. If one selects Black & White (more about this below) he or she can choose to apply, in addition to the parameters above, a set of virtual lens filters which mimic the effects of their real world glass counterparts. The filter color choices are: green, yellow, orange and red (more about this below). 8. A special tab applies compensation for R-D1 vignetting according to the focal length of the lens used for a given file. A slider allows one to vary the strength of this compensation. The results of using this feature are discussed in the File Quality section below.  Epson R-D1, Lens Unknown , ISO 400, 1/500 Second One nice feature of PhotoRAW is that it can automatically apply its settings from the first adjusted RAW file as one moves through successive RAW files. This is a big time-saver when several captures in a folder need similar gray balance, EV, vignetting, etc. corrections. Like Capture One DSLR Pro, PhotoRAW also allows one to work on a new RAW file while others are being processed. Clearly the Epson software designers studied existing RAW conversion programs before designing PhotoRAW. Added December 3, 2015: In 2008 I switched back to using Macintosh computers (which I had used from 1989 - 1995). If I recall correctly, PhotoRaw was still not available for Mac at that time. But back in 2005 I had encouraged Phil Amato, who was then the R-D1 product manager, to work with Phase One on developing support for the RD-1's ERF files in Capture One Pro. He did indeed do that and the company's support for that camera was added. Adobe's Lightroom also added support in the years that followed. I've since used both of those programs for R-D1 conversions and I discuss that aspect further in my long-term review of the R-D1. Epson later introduced a firmware update for the camera which essentially makes it into an R-D1s and which allows simultaneous recording of ERF and JPEG files. While converting files recently for the re-publication of this article I was struck by how appealing they are even now. The camera's sensor, etc. -- of course -- is no match for a modern one with no AA filter but the pictures from the R-D1 and various lenses still resonate for me.  Northampton, Massachusetts, Overcast: Epson R-D1, 50/2.0 Leitz Summicron ISO 800 1/338 sec. Working in Black and White Like many digital cameras, the Epson R-D1 has an option that allows one to record black & white files. These files are created in the camera when recording JPEGs or created by the Epson PhotoRaw program when converting the RAW files. Normally I dont use these kinds of in-camera settings because I prefer to create black & white files from color TIFFs through various methods in Photoshop. The methods I use allow a great deal of creative control over the translation of color to monochrome. In experimenting with the R-D1, however, I discovered an interesting workflow that is useful to me for its flexibility. I set the camera to RAW mode and to the black & white setting. If I open the files in PhotoRAW they will, by default, be displayed as black & white pictures and can then be converted by the program to 16-bit black & white TIFFs. In this case, I never see them in color. If I open the RAW files in Photoshop CS they will be displayed as color files and can be converted easily into 16-bit color TIFFs. What makes the former option particularly attractive is that Epsons formula for converting color to black & white is much to my liking. The R-D1 black & white files look a lot like negatives made on Kodak Tri-X film rated at about ISO 320 and developed in Kodak D76 1:1. There are times when Im working on a project and I only want to see the pictures Im making in black & white. Theres a kind of clarity and simplicity inherent in being able to go through an entire workflow without ever being distracted by the color versions of a set of pictures that are intended only to be black & white. Fewer red herrings come up, so to speak. And since working this way means that there are always RAW files (which of course contain the full color information captured by the sensor) archived to CD one can always go back to a given file and work with it in color or use the color file as the basis for a more sophisticated black & white translation in Photoshop.  Epson R-D1 With Zeiss ZM 21/2.8 Biogon T, ISO 400, 1/350 Second Finally, as mentioned above, the R-D1 allows one to record black & white files as if they had been made with various color filters mounted on the lens: green, yellow, orange or red. These digital filters alter the file in much the same way their real world counterparts alter black and white film. I havent experimented very much with them yet but they look promising and can be applied either by the camera (when recording JPEGs) or to RAW files in the PhotoRAW program. For those who have not experimented much with the use of color filters in black & white photography I recommend Ansel Adams technical books called: The Camera and The Negative. As teaching tools for photographic technique, these books have never been bettered and much of what they discuss about film photography applies (with some variation) to digital capture as well. I first read them when I began in the darkroom at age twelve and they formed a good part of my base knowledge in photographic technique. I recommend them to all serious photographers. All in all, this camera seems to have been designed with special attention to the needs of photographers who work in black & white. Kudos to Epson for thinking of us. File Quality  Epson R-D1 With Leica 21/2.8 Elmarit Aspherical, ISO 400, 1/90 Second Thanks to the kind assistance of a gentleman named Howard Cummer I was able to begin reviewing R-D1 RAW files made at all ISO levels even before the camera itself arrived. In short, they look great certainly the equal of files from 6 MP DSLRs such as the Canon 10D or Nikon D70. The R-D1s color interpretation seems fairly accurate and is certainly pleasing to my eye. Im not in a position to do a numerical noise analysis (Michael Reichmann can do that later on as an addition to this review) but basically the files seem to be about as clean and noise-free as those from my Canon 10D right up to ISO 1600. Their dynamic range seems to be similar as well. I would not hesitate to use any of the ISO settings on this camera. The sensor used in the R-D1 is apparently the same 6.31 MP Sony CCD that is also used in the Nikon D100 and Pentax ist. Its a proven workhorse with very good all-around performance. The Nikon and Canon DSLR files each have their own family look and the look of the R-D1s files are, not surprisingly, closer to that of the Nikon family. What stands out most about the R-D1s file quality, however, is that the camera is able to successfully convey the characteristics of the various rangefinder lenses it can accept. In fact its file quality is sufficiently good that I rarely gave it much thought when I was reviewing files the pictures themselves and the lenses interpretation of the subject just sailed right through. In fact, one might say that the file quality of this camera (at least with 28mm and longer lenses) is, in a sense, transparent. It doesnt really have many notable flaws and as such doesnt call much attention to itself. Some R-D1 owners have suggested that the camera suffers from moderate to significant vignetting when used with certain wide-angle lenses shorter than 24mm. I have not yet been able to test with lenses that wide so I cant make any final comment on that aspect yet. I have, however, looked at samples made by a photographer named Henning Wulff and have the following comments that apply only to Wulfs samples: Leica 21mm Aspherical at F/8: moderate vignetting, should require only moderate correction in PhotoRAW Voigtlander 21mm at F/8: significant vignetting in corners and at left and right sides and may require substantial correction in PhotoRAW (see below) Voigtlander 15mm at f/8: significant vignetting in corners and at left and right sides and may require substantial correction in PhotoRAW (see below) Voigtlander 12mm at f/8: moderate vignetting, should require only moderate correction in PhotoRAW  Epson R-D1, Lens Unknown , ISO 400, 1/550 Second Once again, thanks to Howard Cummer I was able to review RAW files he made with a Leica 24 Elmarit mounted on the R-D1. The files show some vignetting at all apertures with the strength of the effect pretty much correlating with aperture; the smaller the aperture, the less the vignetting. I was able to remove much of the vignetting using various intensity settings on the vignetting slider in PhotoRAW (with the focal length set at the nearest option of 25mm). One has to be careful when selecting the intensity of the correction; over-correct and the corners will actually become lighter than the center of the file. If a picture is going to have a tonal change at its edges or corners Id rather than they be slightly darker than the center of the file rather than slightly lighter. I believe that the human eye is drawn from dark to light and I wouldnt want people viewing my prints to have their eyes drawn to the corners or edges simply because of tone. Ansel Adams, in his famous technical book, The Print in fact recommended a very slight burning (darkening through extra exposure) of the outer edges and corners of a final print to solidify its borders. Those of us whove working with large format cameras are also used to seeing a slight amount of vignetting introduced to the negative by certain lens tilts, rises and shifts. In short, I dont mind if my corners and edges go just slightly darker than the centers of the picture but I wouldnt want them to go lighter. My tentative conclusion, with respect this Elmarit 24 at least, is that the PhotoRAW program is fairly effective at correcting for vignetting. Its important to keep in mind, however, that this compensation achieves its correction by selectively boosting the tonal levels of the file in at the corners and edges. The tonal changes I made to the corners and edges of Cummers Elmarit 24 files (by using the vignetting correction) were not strong enough to introduce noticeable noise. If the vignetting was severe enough and the file made at a high ISO, the corrected areas could show a high level of noise. Ill test the feature further after I work with some wider lenses. It would be interesting to know what effect subject/focus distance had on vignetting with the Elmar 24. My hunch is that it does play a role. In normal use, I havent noticed any objectionable vignetting with the three lenses Ive worked with so far: Canon 28/2.8, Leitz Summicron 50/2.0 and Leitz Tele-Elmarit 90/2.8. I have received many questions about the R-D1s performance with wide angle lenses and I will make testing the camera with those lenses a priority. I expect to have samples of the Voigtlander 12, 15 and 21 (with the matching finders for the R-D1) to test within the next week or two. Ill update this review with those results once Ive had a chance to test them. Price There are currently very few R-D1s in the United States and those that can be found are selling for Epsons suggested price of $2999.00 (as of the date of this writing). I have no idea what costs went into developing and producing this camera but $3000.00 is certainly a lot of money for a 6MP APS-C sensor camera that seems to share many of its components with the $600.00 Voigtlander Bessa R3A film camera. It has been reported that Epson is only producing 10,000 examples of the R-D1 which doesnt give them a huge economy of scale to spread their development and production costs across. That said, I would be surprised if Epson did not make more than 10,000 of these cameras if demand warranted greater production. I think the camera would perhaps sell better at price of $2000.00 but only the people at Epson know for sure how much profit they need to make on this camera in order to recoup their investment in R&D and manufacturing. In the end, though, Epson can set whatever price the market will bear because the R-D1 is a very unique camera with no direct competition. Leica has said that its digital M camera will not appear until 2006 and Zeiss has only hinted at producing a digital rangefinder in the future, perhaps based on its recently announced Zeiss Ikon film rangefinder. It would be good to see more digital rangefinder cameras being developed and competition usually does indeed improve the breed. When the 3.3 MP Canon D30 DSLR was first released in the fall of 2000, it had no direct competition and was priced at, interestingly enough, about $3000.00. Its only approximate competition at that time was the $5000.00 Nikon D1 professional DSLR. The Epson R-D1 right now is the only thing of its kind, without even an approximate competitor.  Epson R-D1, Lens Unknown , ISO 1600, 1/500 Second Its of little consolation, but buyers of this $3000.00 camera will be treated to an initial experience of opening one of the most luxurious and elaborately arranged camera boxes Ive ever seen. Hermes has nothing on Epson in this department. Its enjoyable but the pleasure is short lived. Epson does try to get started on the right note by placing an Our Gift to You brochure as the first document one sees when opening the box. Inside is an announcement that upon registering the camera, new owners will be sent a Tamrac 603 Zoom Traveller 3 camera bag, a customized Certificate of Authenticity suitable for framing and an Adobe Photoshop Elements CD. It seems clear from both the packaging and the certificate that Epson sees this camera as being of interest to camera collectors. Thats all well and good but I think this is a camera that deserves to be used. Conclusion Epsons decision to produce this unique camera was a bold one and they deserve much praise for bringing it to production. In most important respects, the R-D1 functions as the digital rangefinder that many of us have been waiting years for. Its primary flaws are that it needs a much larger RAW buffer and a histogram review mode. It also may have problems with vignetting using very short lenses but Ill need to wait until Im able to test it with various super wide-angle lenses to draw any conclusions. Finally, many people have complained about rangefinder focus problems with the R-D1 using certain lenses and the cause of these problems is undetermined. I did not have focus problems with the example of the R-D1 I tested using the lenses Ive tested so far. The cameras list of strengths is too long to reiterate here but it is a very impressive camera overall and a particularly remarkable performer especially considering that this is Epsons first venture into the world of serious digital cameras. I highly recommend the Epson R-D1.  Epson R-D1, Lens Unknown , ISO 400, 1/680 Second Now that Epson has begun the rangefinder digital camera category, its worth thinking about where it might go from here. Leica, of course, has announced that they will have a digital version of their M rangefinder available in 2006. Since the digital SLR market is now quite full of good options at various price points, perhaps its time for the major Japanese manufacturers to think about introducing digital rangefinders. Canon and Nikon have both made impressive rangefinder bodies and lenses in the past and could do so again. As Epson has demonstrated, one doesnt need expensive or cutting edge sensor technology to make a good digital rangefinder. Since Canon and Nikon both have image quality well in hand, the task would essentially be to put those digital innards in a first-rate rangefinder body. Olympus seems to be re-assessing their strategy for the marketplace, perhaps a 4/3 system rangefinder would be a good model for them to consider. Zeiss has already hinted that there may be a future digital version of the Zeiss Ikon. My suggestions to Epson, Leica, Zeiss and any other maker who might choose to enter this arena are: 1. Concentrate on making a camera with a very quiet shutter. There are many uses for such a camera and a digital camera with both a very quiet shutter and exceptional high ISO performance does not currently exist. The Canon 10D comes close. The benchmark for shutter noise should be the Olympus E-1, a very quiet camera despite being an SLR. Shutter noise has been a traditional advantage of rangefinders over SLRs and should continue to be so. 2. Increase the accuracy of finder framing lines. Since digital files do not go into slide mounts (as much of 35mm film did) it isnt necessary to be so conservative with frameline coverage. Give the photographer the best possible sense of where his or her picture edges are going to fall. 3. Continue to improve high ISO quality. Rangefinders excel for use in existing low light. Clean files at true ISO 3200 and 6400 speeds should be the next goal. 4. For the high-end digital rangefinders, make them with effective weather/dust seals. Traditional Leica rangefinders have a reputation for remaining reliable even in extreme weather. Even though moisture and dust may enter the body, the camera continues to function. Needless to say, a digital camera cannot function with moisture and dust entering the body. The only way to make a digital camera that is reliable in challenging weather is by designing it with seals such as are used on the Canon 1D and 1Ds professional SLR bodies as well as the Olympus E-1. Although existing rangefinder lenses are not weather sealed, future rangefinder lenses with weather seals could be developed and sold to professionals who need all weather capability. Without a sealed body and sealed lenses, a rangefinder can only be a fair weather camera. A professional quality rangefinder shouldnt have that limitation.  Epson R-D1, Lens Unknown , ISO 1600, 1/320 Second This article, the second camera review I had ever written, was first published in November 25, 2004 on Luminous Landscape. I made minor revisions to the article in December of 2015 and added other pictures made with the R-D1 in 2005 and 2006 (made before I switched to a Leica M8 late in 2006). Many of my reviews, essays and other articles can be found in the subscriber section of Reid Reviews. They include an extensive review of the Leica SL and tests of various rangefinder and Leica R lenses on both the SL and the Leica M-240. Reid Reviews accepts no advertising and is paid for entirely by subscribers. Written primarily for professional and serious amateur photographers the site has become known for its in-depth analysis based on both field and studio testing. |