 Adobe Flat Field For Lightroom Classic For
many years now, Adobe has offered a little known plug-in for
Lightroom Classic called Flat
Field, created by Eric Chan, which is designed to
correct for both luminance vignetting and color drift. Until
now, this feature had not been part of the software as
downloaded. But now it comes as a standard part of the
program and for many photographers it will be an important
tool.
This is not a short article but if a photographer wants to use a feature as unusual as Flat Field, it makes sense to first really understand what this feature does and when it is, or is not, worth using. Some of the confusion about Flat Field probably starts with terminology. Adobe describes Flat Field as correcting for shading but thats not necessarily a term thats well understood. It is also sometimes described as correcting for vignetting, luminance vignetting, color shift, color cast, color drift, etc. So lets start by laying out what these terms mean. Luminance vignetting is a darkening of the image off axis. The center is at a certain brightness level but that brightness falls off for areas of the picture located further and further off center. Luminance vignetting is normally caused by the interaction of a given lens with the sensor and optical systems inside a given camera. For example, a Leica 35 Summicron will show different luminance vignetting on a Leica M10 than it will when used, via an adapter, on a Sony A7R III. Luminance vignetting usually changes with aperture and focus distance. Heres an example of the luminance vignetting seen at F/4.5 when a Cosina Voigtlander 15/4.5 III is used on a Leica M10.  Now heres an example of the luminance vignetting seen when a Zeiss Loxia 25/2.4 is used wide open on a Sony A7R III.  Vignetting, used as a term by itself, normally refers to luminance vignetting. But it can also refer to the vignetting of color (the suppression of certain colors) that can happen off-axis in a picture. Since this term can have at least two meanings it can sometimes lead to confusion. Color Shift and Color Cast normally refer to a color change that happens across the frame. For example, if the Loxia picture above were shifted a bit towards red it might look like the picture below. Note that the reddish cast is seen across the entire frame.
 Some people also use the term color shift when they are talking about an off-axis color change but using the term that way can be confusing. Shading, as Adobe uses the term, refers to luminance vignetting combined with color vignetting (the suppression of certain colors off-axis). The vignetting, in this case, is not necessarily symmetrical from side to side or top to bottom. Color Drift is a term I started using in 2006 for a series of articles and, within this context, it has only one meaning. Color drift refers to a gradual off-axis change in color. For example, the center of a picture might be neutral gray but the color drifts from there so that it might become visibly cyan in the corners. It is not necessarily symmetrical from side to side or top to bottom. Later in the article well look at why color drift happens and why it often takes the form of Cyan Drift. Its an important thing to understand. Below is an example of color drift in a picture made using a Zeiss Loxia 25/2.4 wide open on a Sony A7R III. Note that the center of the frame is neutral grey but the color then drifts towards blue-green (cyan) off-axis. This happens much more often than some photographers may realize.  * The term color drift is also sometimes used in reference to changes in the pigmentation of printing ink but, fortunately, that has no connection to what we are discussing here. Knowing that there are so many terms for these changes out there, and that those terms can be confusing, we are going to stick with just two of them (which each have just one meaning) for the rest of this discussion: luminance vignetting and color drift. Using Flat Field To Correct For Luminance Vignetting Lightroom already offers several ways to to correct for luminance vignetting. For some cameras, this correction is baked into the optical codes (opcodes) of the raw file and is applied automatically. For example, when one opens a Fuji RAF file made using a GFX 50R and GF 23/4.0 several lens corrections are applied automatically. In the lens correction pane, clicking the information (i) link next to Built-in Lens Profile applied shows this message overlaying the image. 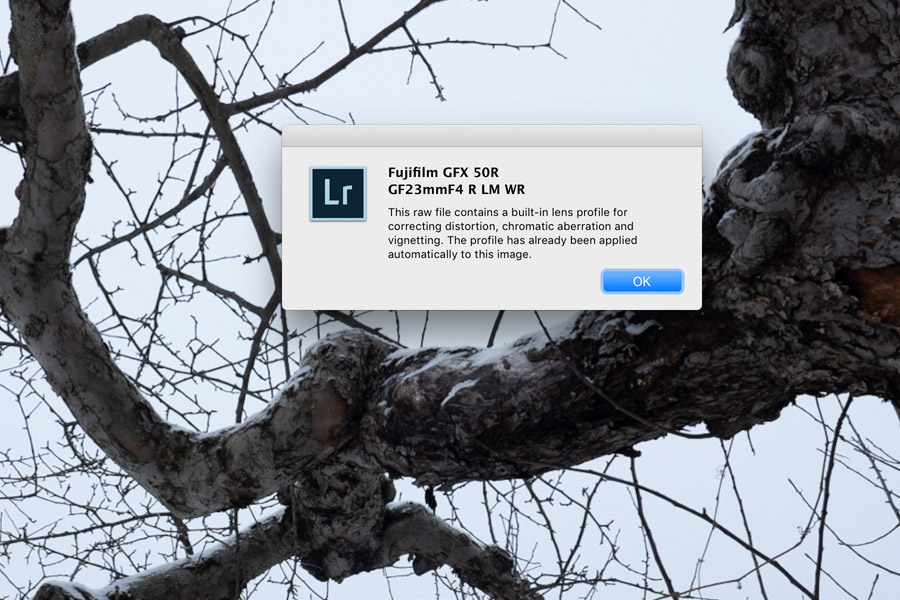 With some other cameras Lightroom gives us a choice as to whether or not lens corrections, including luminance vignetting, will be applied. For example, if one opens a DNG made using a Leica M10-D and 35/2.0 Summicron ASPH the lens correction menu offers the option of applying corrections for luminance vignetting and other aspects. In that case, we see this menu pane. 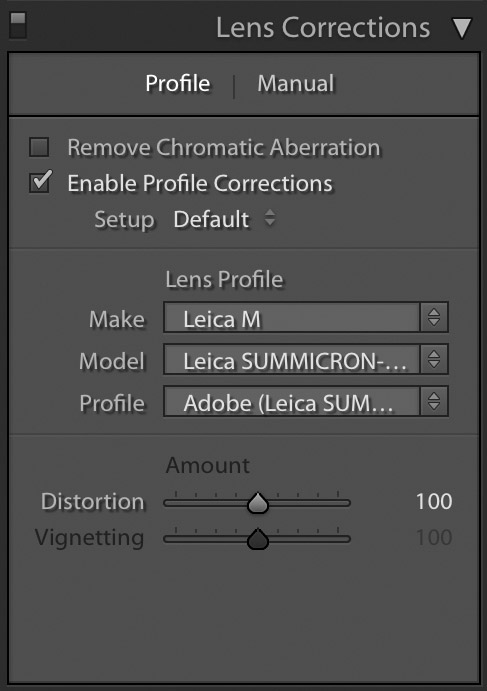 Finally, if Lightroom does not correct for luminance vignetting automatically it allows one to correct for this manually. 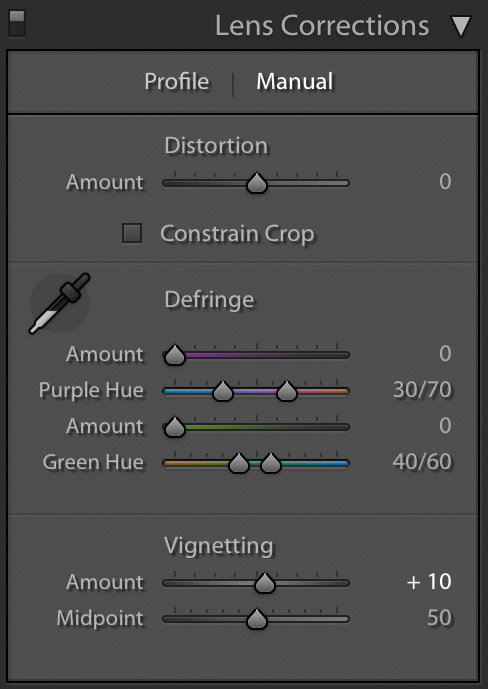 Given that Lightroom already offers at least three ways to correct for luminance vignetting, why would a photographer want to instead use Flat Field to make this correction? Flat Field can allow one to make a fairly exact correction for luminance vignetting without also automatically applying digital corrections for distortion and/or chromatic aberration. For example, here's what the luminance vignetting looks like when a Voigtlander 15/4.5 III is used wide open on a Leica M10. This is a black & white picture conversion. 

It's
an impressive correction to be sure. By comparison, here's what the same source DNG conversion looks like after correction using Lightroom's lens profile for the CV 15/4.5 III (again in B&W).

So now let's see what we can do, working from the same DNG, using Lightroom's manual corrections for luminance vignetting. I used slider settings of +100 for amount and 0 for midpoint. 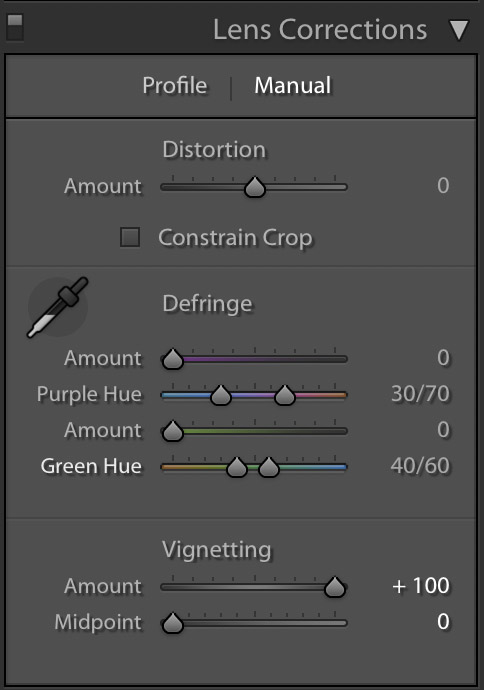
And here's the result in B&W.  This is quite a good result. Luminance vignetting is significantly reduced but not over-corrected. I have been working with the plug-in version of Flat Field for several years now and it excels, as we'll see below, in its correction of color drift. In my view that is its greatest strength. But if a photographer needs only to correct for luminance vignetting, and not for color drift, then using Lightroom's manual corrections for luminance vignetting may be the simplest way to do that -- and also the most flexible. That flexibility is worth thinking about. Flat Field can provide a nearly perfect correction of luminance vignetting. But that might not be what we want. Sometimes, the picture might look better with some (or even a lot of) luminance vignetting left in place. That's very much a personal choice but I myself often like to have the outer edges of my pictures just slightly darker than the rest of the frame. Photographer and master printer Ansel Adams used to give his prints a bit of burning (extra exposure from the enlarger) on the edges to, as he once wrote, "hold the frame". So there are primary visual/aesthetic reasons to leave some degree of vignetting in place. But there's also the secondary issue of noise. Lightroom, like any photography software, corrects for vignetting by applying a levels (or digital exposure) boost to off-axis areas of the frame. When levels are boosted noise can be revealed -- especially at higher ISO levels. The end result can be a picture that has low noise levels on center but much higher noise levels off-axis (especially in the corners). So, as a general rule of thumb, it makes sense to be more and more conservative about vignetting correction as ISO levels increase. With all that in mind, then, if a photographer is only looking to correct for luminance vignetting then Flat Field may not be necessary.
Using Flat Field To Correct For Color Drift
Color drift is a topic that some photographers may not be very familiar with so I will overview it quickly here. The sensor in a typical digital camera is sensitive not only to visible light but also to infrared. For that reason, most digital cameras include a filter in front of the sensor which is designed to block infrared. If that wasn't in place, pictures made with the camera would show reddish color shifts, slightly soft focus (because IR focuses at a different distance than visible light), etc. Unfortunately, when a digital camera is used with a lens that has about a 50 mm or wider effective field of view (based on my tests over the years) its IR filter can end up blocking not only infrared but also parts of the visible light spectrum which are close to visible red. So this can happen with a 50 mm lens with a full frame 35 mm format sensor, a 35 mm lens with a APS-C sensor, a 25 mm lens with an mFT sensor, etc. The strength of this color blocking depends on the camera, the lens design, etc. but it's more common at these focal lengths and wider. And, as a rule of thumb, the wider the lens the more likely it is to show cyan drift. The result of this reddish color blocking is often a color drift towards cyan off-axis -- cyan drift. The exact color varies depending on the camera, lens, lighting conditions, etc. but is normally somewhere on the blue-green spectrum. In some cases, the color drift will not be the same from corner to corner. For example, here's what the color drift looks like when a Leica 28/2.0 Summicron lens is used at F/5.6 on a Leica M (Typ 240) with the camera's lens detection system turned off.  Here we see a color drift that runs sort of blue-purple as well as some luminance vignetting. This drift is the result of the lens interacting with the camera's IR filter. But Leica is one of the camera manufacturers that corrects for color drift in-camera before writing the raw file. So here's how things look (same lens, same camera, same test) when the camera's lens detection system is set to auto.  It is not a perfect correction but things are much improved. The corners are now much closer to the neutral grey color of the center. Now let's go back to the file made with the Leica's lens detection system turned off and convert it using Flat Field.  The result is impressive. Flat Field has corrected for both luminance vignetting and color drift so that we end up with a file that is almost color and tone neutral from corner to corner. And this matches what I have seen, from all kinds of camera and lens pairings, using the plug-in version of Flat Field. So do you need this feature? That depends on what camera and lens combinations you use. Many camera makers do a good job of correcting for color drift before the camera writes the JPEG or raw file. When I test a lens, luminance vignetting and color drift are two aspects that I always look at. I have studio equipment set up specifically for that testing and it does a good job of showing me how well a given lens/camera pairing performs in these respects (as well as how it does in terms of resolution, color fringing, distortion, etc.) As long as one is using matched system lenses, I have seen good to excellent internal color drift correction in cameras from Fuji, Leica and Ricoh/Pentax. I have not tested a Canon lens recently but in my past tests the Canon 5D and 1Ds series cameras did an excellent job of correcting for color drift. I, unfortunately, don't have a good sense of how well current Nikon cameras deal with color drift. I have no reason to suspect a problem but I don't have the test information to know one way or another. The same is true for Sigma. I have tested a lot of their cameras but have not done Sigma lens tests that look at vignetting and cyan drift. I have, however, tested a fair number of Sony FE mount lenses on A7 and A9 series bodies. As of this writing, and much to my surprise when I first discovered it, the current A7 and A9 series bodies do not seem to correct for color drift even with Sony's own FE series lenses. To date, I have seen color drift from the following pairings: Sony FE 28/2.0 on Sony A7R III Sony FE 35/1.4 on Sony A7R III Sony FE 35/2.8 on Sony A7R Zeiss Loxia 25/2.4 on Sony A7R III Zeiss Loxia 35/2.0 on Sony A7R Zeiss Loxia 50/2.0 on Sony A7R I have no reason to believe that color drift is present only on those lens/camera pairings. They just happen to be some examples of pairings that have shown it in my testing to date. Sony's cameras are outstanding in many ways and I'm hopeful that the company will provide color drift correction in future models. Lightroom's current lens profiles, to the best of my knowledge, do not provide color drift correction for lenses used on Sony models or any other camera. So if you are working with a Sony A7 or A9 series camera (and maybe others as well), you might want to consider using Flat Field to correct for color drift. It has worked as effectively on Sony files, in my lens tests, as it did on the Leica M-240 file we saw above. A typical picture can show so many different shapes, tones, colors, etc. that color drift often ends up being hidden. It is, of course, more obvious in subjects that show continuous tone (solid color walls, forests of similar trees, etc.) but much less noticeable in others. So one could potentially work with a camera for years and not notice or be bothered by color drift. If that group includes you then you may not want or need to use Flat Field. If it ain't broke don't fix it. But I have come across many photographers who are frustrated with the fact that they just can't seem to get the color rendering of their cameras dialed in to their satisfaction. The natural solution people try for this is to experiment with color profiles. And those often do the trick. But if a file shows color drift there is no way to color profile around that. If one dials in the center, the corners will run cold. If the corners are dialed in, the center will run warm. So I suspect that there are a lot of photographers out there who have been chasing color profiling when the solution they actually needed was to correct for color drift. The next group of photographers who may have a need for Flat Field are those who work with adapted lenses. A classic example here would be the many people who use Leica M-mount rangefinder lenses on Sony bodies. But since many electronic finder cameras (EFCs) have short register distances they are able to work with various adapted manual lens. So there are lots of potential EFC/manual lens pairings that can happen. Let's call these hybrid pairings. When one mounts an adapted manual lens on a digital camera, the camera (with few exceptions) has no idea what lens is mounted on it and certainly has no idea of what color drift to correct for. So, assuming an effective field of view of 50 mm or less, almost any hybrid lens/camera pairing is likely to show some color drift. The Leica M and SL series cameras have a menu option that can be used to provide corrections for certain adapted lenses but I can't currently think of any other cameras which offers that. The Leica CL offers a lens menu for adapted lenses but doesn't seem to offer color drift correction even when that option is used. So, is Flat Field a processing option you should look into? It might be worthwhile if you work at a 50 mm or wider EFOV and use: 1. Sony A7 or A9 series cameras or any other models that do not automatically correct for color drift 2. A hybrid pairing of a digital camera and an adapted manual lens 3. A Leica M series camera with a lens wider than 16 mm 4. Any digital camera that corrects for color drift but isn't correcting it well enough for your needs So that means a lot of photographer will not need Flat Field. But for those who need it, this tool can be invaluable. Creating A Flat Field Calibration Frame Flat Field works by analyzing a reference picture (Adobe calls this a calibration frame) which, it assumes, will have even tone and color from corner to corner. It looks at any ways that the calibration frame differs from even tone and color and creates corrections so that the off-axis areas match the tone and color of the center. With a typical source picture, which might show luminance vignetting and cyan drift, Flat Field would lift brightness off-axis and warm the color as needed off-axis. It can then transfer the corrections it has learned, from the reference picture, to other pictures. Since I test lenses professionally, I have a studio test board set up that is evenly off-white and is lit so that it varies less than 1/3 stop in brightness from corner to corner. I use that to make my calibration frames. But obviously that's a specialized set up. To get a fairly useful long term set of Flat Field calibration frames, I recommend photographing a featureless white wall that is as evenly lit as possible. Sometimes the easiest place to find something like that is outdoors on an overcast day. You can use the spot meter on your camera to measure the brightness of the area you plan to photograph at various points from corner to corner. Ideally, you'd want the brightness of the wall to vary by 1/3 stop or less but that isn't always possible. Do the best you can. I recommend making a calibration frame for each lens/camera pairing you feel might need help from Flat Field. You could make calibration frames at every aperture, in various kinds of lighting, etc. but I think that makes the task overly complicated. Instead, I recommend making each calibration frame at F/8. Luminance vignetting, on most lenses, is strongest at wide apertures but color drift tends to be pretty consistent across apertures. By making the calibration frames at F/8 you'll likely end up with useful color drift correction without triggering an over-correction of luminance vignetting. Make notes as you are creating the calibration frames so that, when EXIF data isn't recorded, you will know what frame goes with what camera/lens pairing. When you ingest the pictures into your computer, title each one in a clear way. For example: FF_Calibration_A7R3_Summicron_35_ASPH; FF_Calibration_A9_FE_28, etc. Move these pictures to a folder that you might title: Flat Field Calibration Frames or whatever name you'd like. I like this method as a long-term way to create Flat Field calibration frames without needing to make new ones each time I shoot. Alternately, Adobe suggests creating a calibration frame by placing a diffuser card in front of the lens, making a single picture with it in place and then making other pictures (normally) under the same conditions. Naturally, one would want to match the lens (and focal length setting if using a zoom lens) for the calibration frame and the normal pictures. Frankly, I think that using Flat Field with a zoom lens might get quite complicated. But with primes, the core idea is to -- at very least -- create a new calibration frame (using the diffuser card) each time a lens is changed. The calibration frame, hopefully matched to the lens used and conditions of a set of pictures, is then stored with the pictures for use by Flat Field. Adobe's idea is interesting and probably can work quite well. But for the sake of simplicity I prefer to just create a long-term stored folder with calibration frames for each camera/lens pairing (as discussed just above). You, obviously, can choose whichever method works best for you. Using The New Flat Field Menu Option Before I go through the steps for using the new Flat Field menu option, let's take a look at a sample picture we'll be comparing below. It was made at ISO 400 using a Leica M10 and Voigtlander 10/5.6 Heliar-Hyper Wide. Manual lens detection was switched off in the M10 because the camera doesn't offer any settings for a lens this wide. We also don't want to use in-camera color drift correction if we're planning to use Flat Field for color drift correction (because it is generally a bad idea to correct a raw file twice for the same thing). The M10 natively outputs a DNG as its RAW file. Ricoh/Pentax cameras do the same. If your camera outputs in another format (ARW, RAF, etc.) then the files will be converted to DNG as part of Flat Field's processing. The conversion below was done in Lightroom directly from the M10's DNG with no Flat Field correction applied. Here's the full frame of a file called CV10_L1006434.dng. 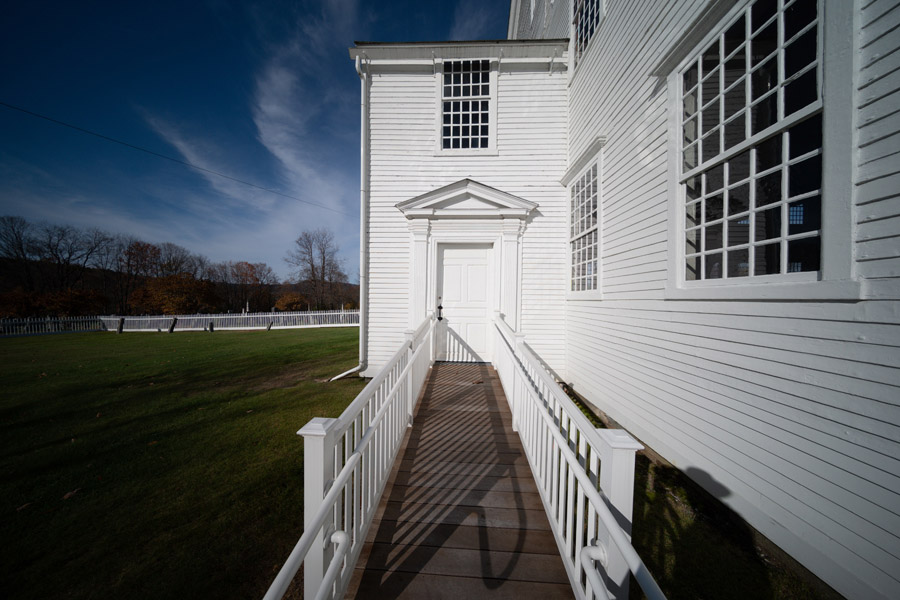
Note the luminance vignetting and the cyan drift off axis. Here's a cropping of the upper right corner from the picture seen at actual (100%) size. 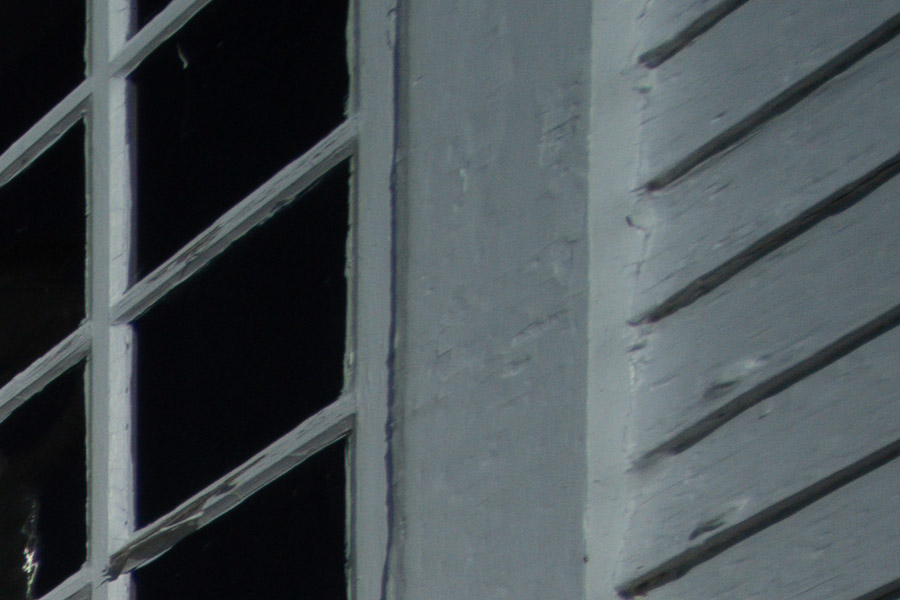 Notice how the white-grey color of the building is rendered in cyan here. That's color drift created by the interaction of the lens and the M10's infrared filter. Now let's step through how we would process this using Flat Field and compare the results to the conversion made without it. As a field calibration frame I am using a F/5.6 test picture that I made with this same camera/lens pairing. It is a picture of my white studio vignetting test board lit so as to show less than 1/3 stop reflected brightness difference from corner to corner (as seen in life). It is a DNG straight from the camera and, uncorrected, it looks like this.  Naturally, we can see the luminance vignetting and color drift created by this camera/lens pairing. It doesn't matter that the frame is not yet white balanced because what Flat Field will look for are changes in color and luminance off-axis relative to the center. So now I create a folder that, in this case, includes seven image files I want to correct (all made with the M10 and CV 10/5.6) as well as the field calibration frame. There could be any number of pictures (to be corrected) in this folder but there should only be one field calibration frame. That calibration frame needs to be either the first or the last picture in the set and Lightroom will use it to correct all of the other pictures selected. Here are the steps I now follow: 1. After opening Lightroom I create a new catalog and import all eight pictures (the seven image files and the picture serving as the calibration frame). In this case, the calibration frame is the first one in the series. 2. In the library module I select all eight pictures and then choose Flat-Field Correction from the Library drop down menu. 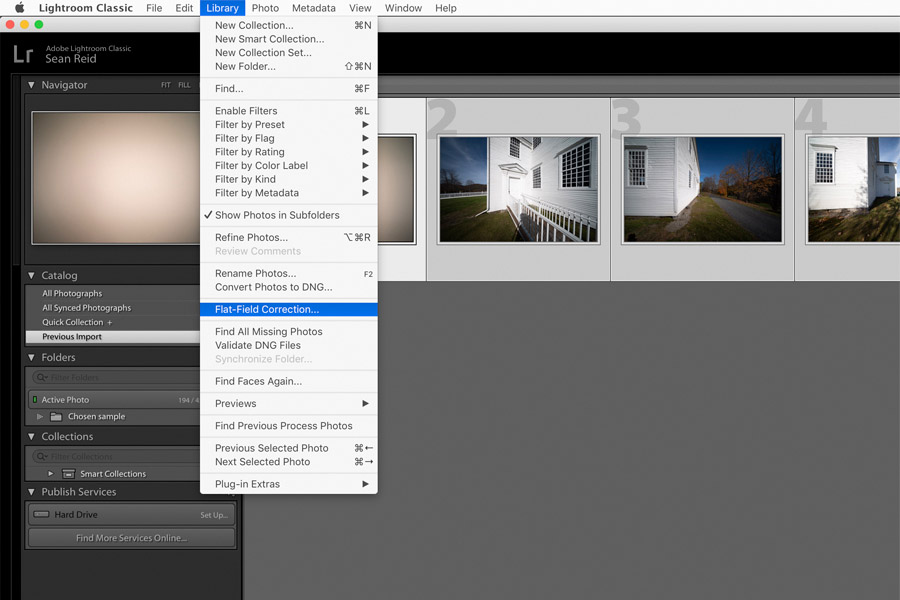 3. The following dialog box appears. 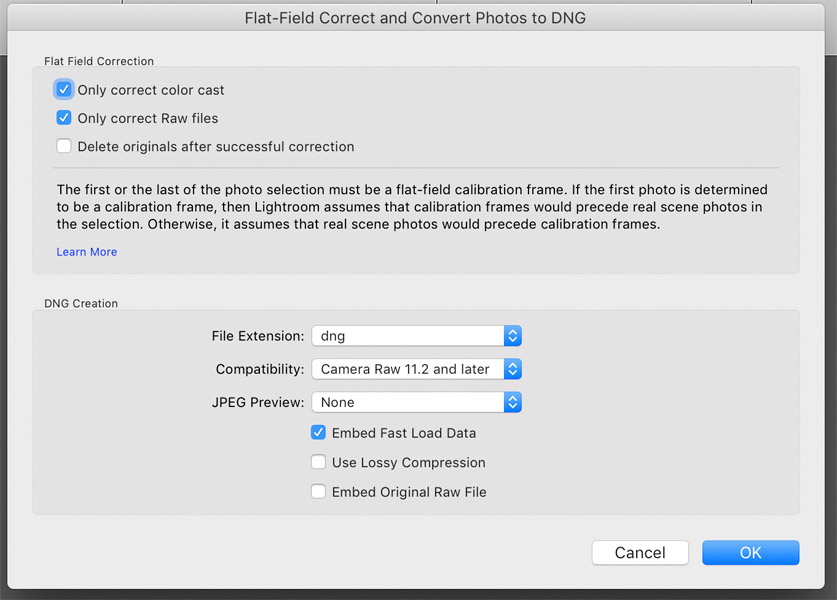 As we can see above I have chosen to have Flat Field correct only for color drift (which Adobe here calls color cast) and to correct only raw files. I have not asked it delete the original raw files after correction because I will want to archive those later. My files, for this folder and album, are already in DNG format but if they weren't then Lightroom would convert them to DNG at this point. 4. I click OK and Lightroom does its Flat Field processing. It now shows the processed DNGs with a -2 appendage on each.  5. If at this point I happened look at this folder of pictures in the finder I would see that I have all my originals as well a -2 version of each which has been processed by Flat Field. 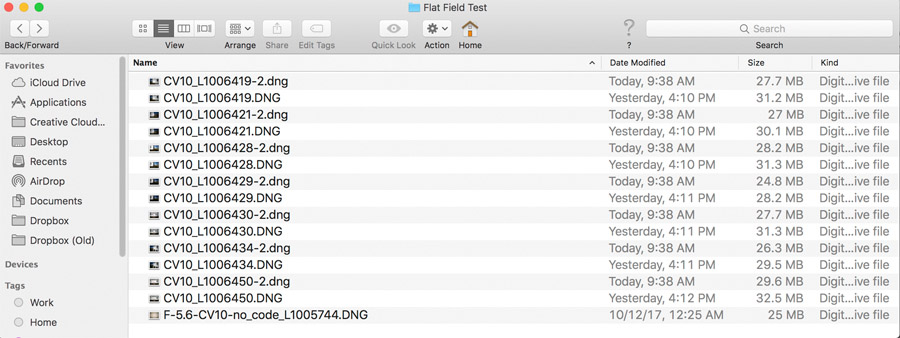 I now go to the Develop module and process the files in Lightroom as usual. That's it. It's quite straightforward. Above we saw what CV10_L1006434.dng, which had no Flat Field processing, looked like after conversion. Let's now see what CV10_L1006434-2.dng (which was processed by Flat Field) looks like after conversion. 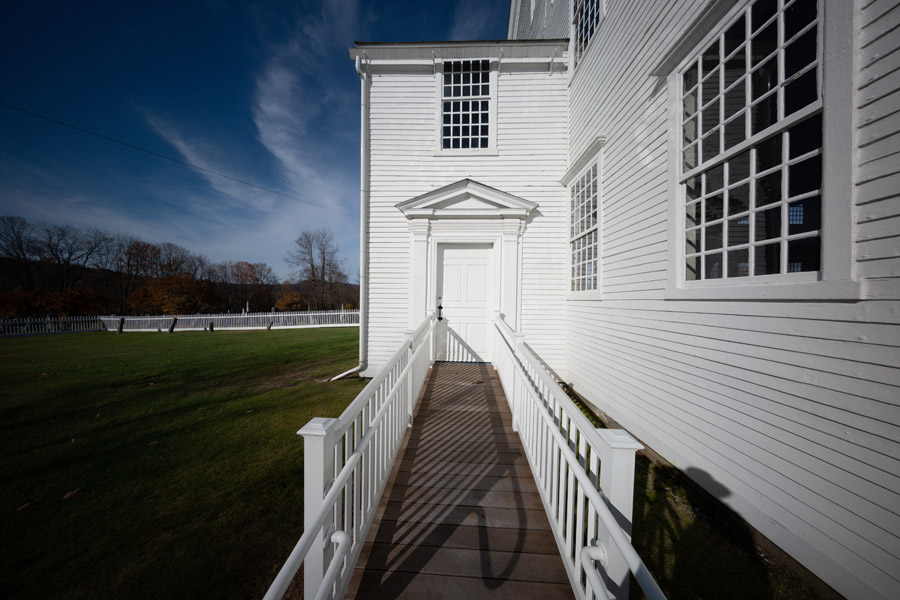 Notice how the the corners that had been cyan, in the conversion made without Flat Field, are now just grey -- as they should be. Flat Field has removed the cyan drift quite effectively. Here's the version without Flat Field, again, for comparison. The difference between the two is quite visible. Now, let's step backward for a moment and run CV10_L1006434.dng through Flat Field once again but this time allowing the program to correct for both color drift and luminance vignetting. We do that by unchecking the box next to "Only correct color cast". The settings in the dialog box now look like this. 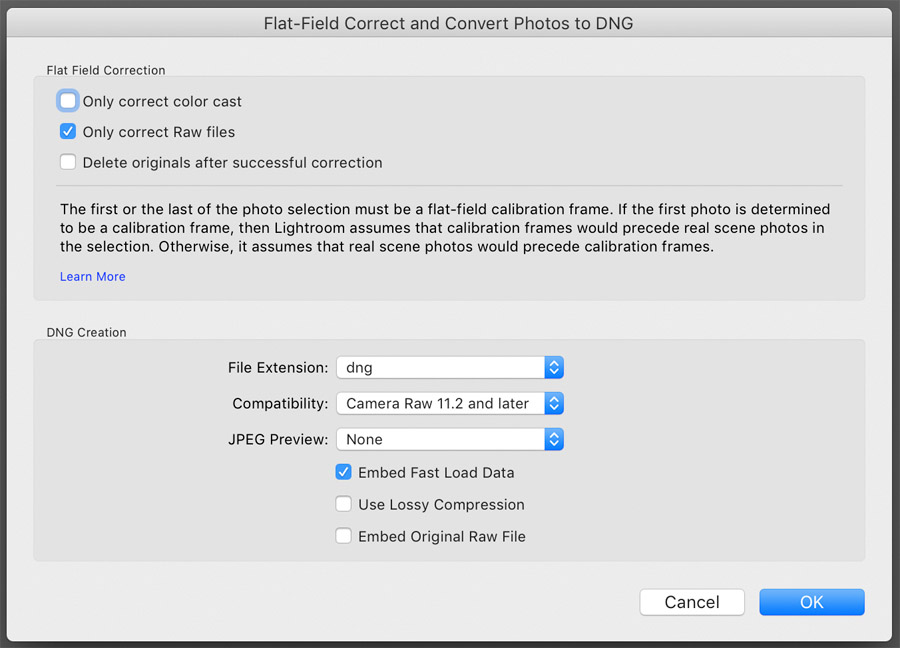 The new converted file looks like this. 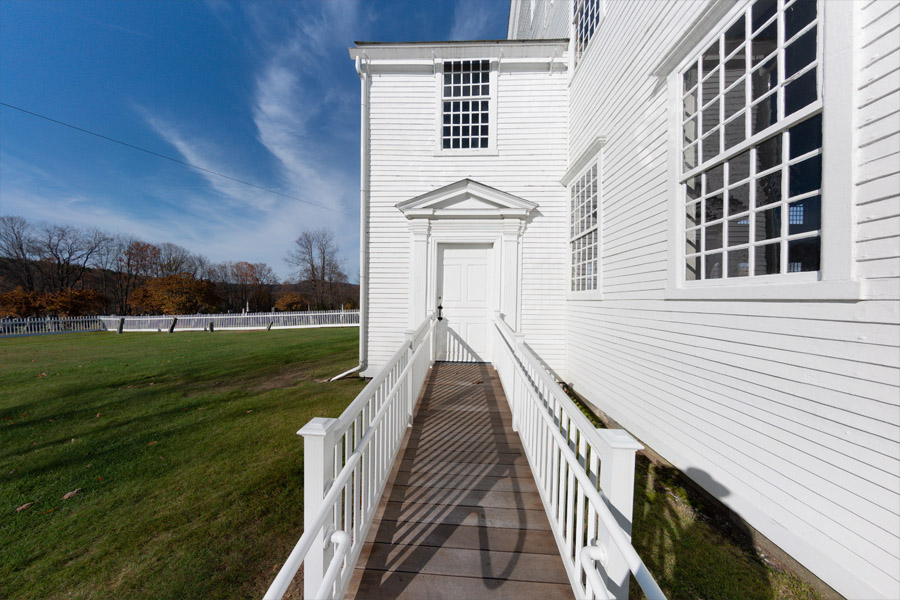 Both the color drift and the luminance vignetting have been quite successfully corrected by Flat Field. My own preference, when using Flat Field, is to correct for color drift only (again, Adobe calls this color cast in the Flat Field dialog box) and then to correct for luminance vignetting, to some degree, using the program's manual vignetting controls. That way I can dial in just how much luminance vignetting correction I want for a picture. This particular picture was made at ISO 400 but being cautious about luminance vignetting correction, as I discussed above, becomes even more important at higher ISO levels. That said, your preference might be to allow Flat Field to correct for both color drift and luminance vignetting. And, of course, your choice of which Flat Field method to use might vary by picture, subject, lighting, etc. Concluding Thoughts Flat Field, as I've written for several years now, is a very effective tool. What Adobe has done by integrating the tool into Lightroom Classic, as a standard feature, is to streamline the process of using it. With a little bit of practice and familiarity, it is quite simple to work with. The key to getting effective Flat Field correction is to have a good calibration frame for each camera/lens pairing that one thinks might benefit from this processing. I lay out my preferred methods for making these calibration frames above. The quality of a Flat Field correction, of course, is directly related to the quality of the calibration frame it relies on. I have some ideas about how Adobe might be able to help photographers with this aspect of the correction and I will be discussing that with them soon. And, of course, a lot of camera/lens pairings don't need to rely on Flat Field processing because the cameras already do an effective job of correcting for color drift before writing the raw file. See above for more details on that topic. I would guess that a large percentage of photographers are currently using camera/lens pairings that don't need to rely on Flat Field corrections. But for those photographers who need access to corrections like this, especially when those corrections might be asymmetrical, Flat Field does its job very well. This article was first published on May 14, 2019 by Sean Reid of Reid Reviews. From its founding in 2005, Reid Reviews has been supported entirely by subscribers. The site provides extensive camera and lens reviews, as well as essays about photography, in a completely non-commercial setting. The site has no advertisements, no commissionable links, etc. Virtually all of the topics mentioned in the article above, including tests of the color drift/luminance vignetting performance of many different camera/lens pairings, are covered on the site. For an overview of what we've covered to date, please see our article index.
|